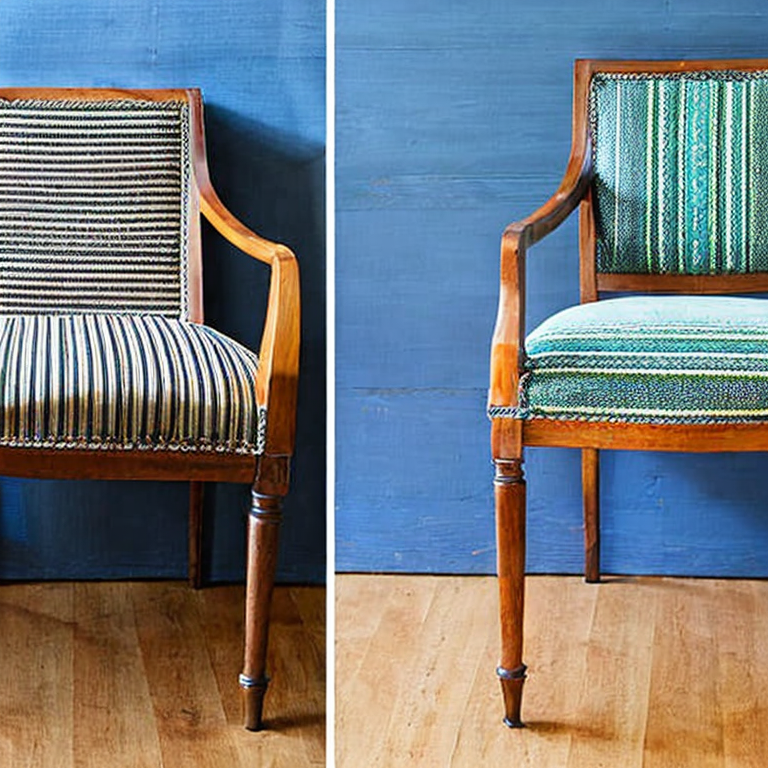
Chair Makeover: Transform Your Seating in 5 Easy Steps
Upholstering a chair can be a fun and rewarding project for anyone who is interested in DIY home decor. In this guide, we will cover the step-by-step process of upholstering a chair, including the materials and tools you will need.
Materials:
– Chair
– Fabric
– Foam padding
– Batting
– Scissors
– Staple gun
– Upholstery tacks or decorative nail head trim (optional)
Step 1: Remove the old upholstery
The first step in upholstering a chair is to remove the existing upholstery. Use a pair of scissors to cut away the fabric and batting, being careful not to damage the chair frame or any foam padding that may be underneath.
Step 2: Clean the chair frame
Once the old upholstery has been removed, take a moment to clean the chair frame. Use a damp cloth to wipe away any dust or debris that may have accumulated.
Step 3: Cut the foam padding
To provide a comfortable seat, you will need to add foam padding to the chair. Measure the seat and back of the chair and cut the foam to fit using a pair of scissors.
Step 4: Attach the foam padding
Using a staple gun, attach the foam padding to the chair frame. Start by stapling the foam to the underside of the seat, then work your way around the edges. Repeat this process for the back of the chair.
Step 5: Add batting
Once the foam padding has been attached, add a layer of batting on top. This will help to smooth out any lumps or bumps in the foam and provide a soft cushioning. Use the staple gun to attach the batting to the chair frame, working your way around the edges.
Step 6: Cut the fabric
Now it’s time to cut the fabric. Measure the seat and back of the chair, adding a few inches of extra fabric on each side to allow for folding and stapling. Cut the fabric to size using a pair of scissors.
Step 7: Attach the fabric
Starting with the seat of the chair, lay the fabric over the foam and batting, making sure it is centered and smooth. Pull the fabric taut and staple it to the underside of the chair frame. Work your way around the edges, folding the fabric neatly at each corner. Repeat this process for the back of the chair.
Step 8: Add decorative trim (optional)
If desired, you can add decorative upholstery tacks or nail head trim to the edges of the chair. Simply hammer the tacks or trim into place along the edges of the fabric.
Congratulations, you have successfully upholstered a chair! With a little bit of patience and some basic tools, you can create a beautiful and functional piece of furniture that is uniquely your own.
Uncovering Upholstery Woes: Chair Makeovers Gone Wrong
Upholstering a chair can be a challenging task, especially if you’re new to it. There are various issues that one may come across during the upholstery process. Here are some of the most common and uncommon issues that you may encounter while upholstering a chair, along with solutions, tips, and advice:
1. Sagging or uneven padding: This is a common issue that occurs when the padding is not evenly distributed. To fix this, remove the upholstery and padding and start again. Make sure to distribute the padding evenly and tightly, so it doesn’t sag or become uneven.
2. Fabric wrinkles or bunching: Wrinkles and bunching of the fabric can occur if the fabric is not pulled taut enough or if the padding is not evenly distributed. To avoid this issue, make sure to pull the fabric tightly and evenly while stapling it to the chair. Also, use a fabric with some stretch to it, which will help prevent wrinkles.
3. Crooked or uneven seams: This issue is commonly caused by improper alignment of the fabric. To avoid this, take your time to align the fabric properly before sewing the seams. Also, make sure to use a measuring tape and a straight edge to ensure that the seams are straight.
4. Stained or dirty fabric: This is an uncommon issue that can occur if you’re not careful during the upholstery process. To avoid this, make sure to keep your workspace clean and free of debris. Also, use a protective cover over the chair while working to prevent any accidental spills.
5. Broken or damaged frame: This is an uncommon issue that can occur if the chair is old or has been used excessively. To fix this, you may need to replace the damaged parts or reinforce them with additional wood. In some cases, it may be best to seek professional help to ensure that the chair is safe to use.
Overall, upholstering a chair requires patience, attention to detail, and a steady hand. Make sure to take your time and follow the steps carefully to ensure a successful upholstering project.
Revamp Your Seating: Master the Art of Upholstery
For advanced upholstery enthusiasts, there are numerous projects that you can take on to further hone your skills. Here are a few ideas:
1. Ottoman: Ottomans are a great project for an advanced upholsterer. They are similar in size and shape to a chair seat, but they are smaller and can provide a good opportunity to practice your skills before moving onto larger pieces. You can start by building a simple wooden frame, then adding foam and fabric to create a comfortable and stylish piece of furniture.
2. Headboard: Upholstered headboards are a popular DIY project that can be customized to match any bedroom decor. To make a headboard, you’ll need a wooden frame, foam padding, and fabric. You can create tufting, piping, or other decorative elements to give your headboard a unique look.
3. Sofa: While sofas are more complicated than chairs, they are a great project for advanced upholsterers who want to take on a bigger challenge. You’ll need to start by building a sturdy wooden frame, then adding foam and fabric to create the cushions. There are many different styles of sofas to choose from, including traditional, modern, and sectional.
4. Dining Chairs: If you are looking for a smaller project, you can try upholstering dining chairs. They are similar in size and shape to a chair seat, but they usually require more fabric than a standard chair. You can also add decorative elements like nailhead trim or piping to give your dining chairs a custom look.
When taking on any of these projects, it’s important to take your time and pay attention to detail. Always measure twice, and cut once, and use high-quality materials. Additionally, don’t be afraid to experiment with different fabrics and textures to create a unique look that reflects your personal taste and style.
Tags: affordable, chair, comfortable, craftsmanship, Creativity, DIY, fabric, foam, furniture, homedecor, interiordesign, makeover, refurbishment, renovation, step-by-step, stylish, techniques, tools, tutorial, upholstery
Tweet