Revamp Your Dining Space: Table Refinishing 101
Refinishing a table is a great way to give new life to an old piece of furniture. The process involves removing the old finish, repairing any damage, sanding, staining (if desired), and applying a new finish. Here’s a step-by-step guide on how to refinish a table:
1. Gather your supplies. You’ll need protective gloves, safety glasses, a mask, a drop cloth, a scraper, sandpaper (in various grits), wood filler, a putty knife, a staining cloth, and a finish applicator.
2. Remove the old finish. Begin by stripping the old finish off of the table. You can use a chemical stripper or a heat gun to do this. Follow the instructions on the product carefully, and use a scraper to remove the old finish.
3. Repair any damage. After stripping the old finish off, you may notice that the table has dents, scratches, or other damage. Fill in any holes or cracks with wood filler. Allow the filler to dry and sand it down until it’s smooth.
4. Sand the table. Once the old finish has been removed and any damage has been repaired, you’ll want to sand the table. Start with a coarse grit sandpaper (like 80 grit) and work your way up to a finer grit (like 220 grit). Sand with the grain of the wood to avoid scratches.
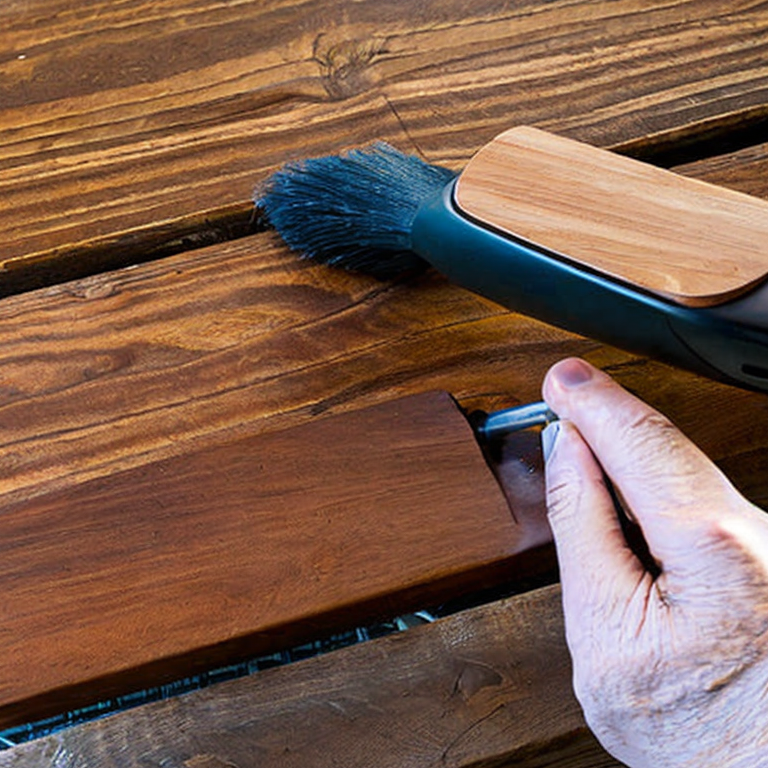
5. Stain the table (optional). If you want to give your table a new color, you can apply a stain after sanding. Follow the instructions on the product carefully. Apply the stain with a staining cloth and wipe off any excess.
6. Apply the finish. Once the stain has dried (if you applied it), it’s time to apply the finish. There are different types of finishes, including polyurethane, varnish, and lacquer. Follow the instructions on the product carefully. Apply the finish with a finish applicator and allow it to dry completely.
7. Sand between coats (optional). If you want to apply multiple coats of finish, you’ll need to sand between each coat. Use a fine grit sandpaper (like 220 grit) and sand lightly to remove any imperfections.
8. Enjoy your refinished table! Once the final coat of finish has dried, your table is ready to use.
Refinishing a table can be a time-consuming process, but the end result is well worth it. With a little patience and attention to detail, you can transform an old, worn-out table into a beautiful piece of furniture that will last for years to come.
Table Refinishing Woes: The Top Troubles to Tackle
Refinishing a table can be a great way to give new life to an old piece of furniture. However, it can also be a challenging process with several potential issues that may arise. Some of the most common issues that one may come up with when refinishing a table include:
1. Stripping the Finish: One of the most challenging parts of refinishing a table is removing the old finish. If the finish has been on the table for a long time, it may be difficult to remove using traditional stripping methods. A solution to this problem is to use a heat gun to soften the finish and then scrape it off with a putty knife.
2. Stains and Discoloration: If the table has any stains or discoloration, this can be difficult to remove without damaging the wood. A tip to fix this is to sand the affected area down to bare wood and then apply a wood bleach to lighten the area. Once the area is dry, you can sand it again and apply a new finish.
3. Uneven Staining: If you are staining the table, it is important to apply the stain evenly. Uneven staining can result in a patchy appearance. A solution to this is to apply a pre-stain conditioner to the wood before applying the stain. This will help the stain absorb more evenly.
4. Dust and Debris: When applying a new finish, dust and debris can settle on the surface, leaving a rough finish. To avoid this, make sure to work in a clean and dust-free environment. You can also use a tack cloth to wipe down the surface before applying the finish.
Some of the less common issues that one may come up with when refinishing a table include:
1. Warping: If the table is not properly dried or stored, it may warp over time. To fix this issue, you may need to apply moisture to the affected area and then clamp the table to straighten it out.
2. Cracks and Splits: If the table has any cracks or splits, these can be difficult to repair. A solution to this is to use a wood filler to fill in the gaps. Once the filler is dry, you can sand it down and apply a new finish.
3. Knots and Imperfections: If the wood has any knots or imperfections, these can be difficult to remove without damaging the wood. A tip to fix this is to use a wood conditioner to help the wood absorb the finish more evenly.
Overall, refinishing a table can be a challenging but rewarding process. By following these tips and solutions, you can avoid some of the most common and uncommon issues that may arise and end up with a beautiful, restored piece of furniture.
Table Transformation: Master the Art of Refinishing
For advanced users who are already experts in refinishing a table, there are several other projects that they can take on. Some of these projects include:
1. Refinishing Chairs: Similar to refinishing a table, chairs can also be refinished to give them a fresh new look. Advanced users can experiment with different colors and finishes to achieve a unique look. It’s important to pay attention to the details of the chair, such as the curves and angles, to ensure that the finish is consistent and even.
2. Refinishing Cabinets: Refinishing cabinets can be a more challenging project, but it can also be very rewarding. Advanced users can experiment with different finishes, such as a distressed or antique look, to give the cabinets a unique character. It’s important to properly prepare the cabinets by cleaning and sanding them before applying any finish.
3. Refinishing Floors: Refinishing floors can be a time-consuming project, but it can completely transform a room. Advanced users can experiment with different stains and finishes to achieve the desired look. It’s important to properly prepare the floors by sanding and cleaning them before applying any finish.
4. Refinishing Doors: Refinishing doors can be a fun and challenging project. Advanced users can experiment with different colors and finishes to match the style of the room. It’s important to properly prepare the doors by cleaning and sanding them before applying any finish.
When taking on these advanced projects, it’s important to remember that patience and attention to detail are key. It’s also important to properly prepare the surface before applying any finish, as this will help ensure a smooth and even finish. Finally, be sure to experiment with different finishes and techniques to achieve a unique and personalized look.
Tags: DIYfurniture, DIYhomedecor, furnituredesign, furnituremakeover, furniturerefinishing, furniturerenovation, furniturerepair, furniturerestoration, furniturestaining, furniturestripping., homeimprovement, interiordesign, painting, restorationtechniques, sanding, staining, tablerefinishing, upcycling, varnishing, woodwork
Tweet