Revive Your Smoke Alarm: Unleash Its Full Battery Potential!
Changing smoke detector batteries is an essential maintenance task that helps ensure the proper functioning of your smoke detectors. In this guide, I will provide you with step-by-step instructions on how to change the batteries in your smoke detector, assuming you have little to no prior knowledge on the topic.
Before we begin, it’s important to note that smoke detectors typically use either 9-volt batteries or AA batteries. However, the exact battery type may vary depending on the specific model of your smoke detector. Always refer to the manufacturer’s instructions for your particular device to ensure you use the correct battery type.
Now, let’s get started with the process of changing smoke detector batteries:
Step 1: Prepare for Safety
First and foremost, it’s crucial to prioritize safety during this task. Ensure that you have a stable step ladder or stool, if needed, to safely reach the smoke detector. Additionally, gather a fresh set of batteries that are compatible with your smoke detector.
Step 2: Locate the Smoke Detector
Smoke detectors are typically installed on the ceiling or high on the walls, preferably near bedrooms or common areas in your home. Look for a small, round or rectangular-shaped device attached to the ceiling or wall.
Step 3: Assess the Smoke Detector Type
Before proceeding, determine whether you have a battery-only smoke detector or a hardwired one with a battery backup. Battery-only smoke detectors are powered solely by batteries, while hardwired ones are connected to your home’s electrical system but have a battery as a backup power source.
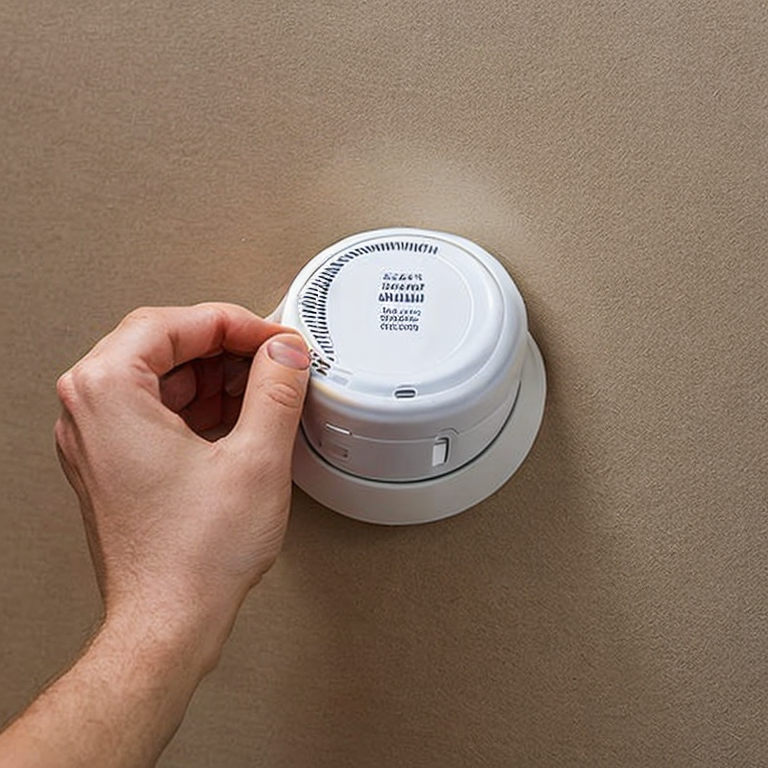
Step 4: Remove the Smoke Detector
If your smoke detector is attached to a mounting plate, gently twist it counterclockwise to detach it from the plate. For other models, you may need to press or squeeze tabs to remove the detector from its mounting base. Be careful not to apply excessive force to avoid damaging the detector or the ceiling/wall.
Step 5: Open the Battery Compartment
Once you have removed the smoke detector, locate the battery compartment. It is usually on the back or side of the detector. Some models may have a sliding cover, while others may require you to press a latch or use a screwdriver to open the compartment.
Step 6: Remove the Old Batteries
Identify the old batteries inside the compartment and take note of their orientation. Depending on the model, you may need to gently pull them out or press a release button to remove them. Avoid touching any metal components inside the compartment to prevent electrical shock or damage.
Step 7: Insert the New Batteries
Take your fresh set of batteries and align them correctly with the polarity markings indicated in the battery compartment. Typically, there will be plus (+) and minus (-) signs to guide you. Insert the batteries firmly, making sure they fit snugly and securely.
Step 8: Close the Battery Compartment
After inserting the new batteries, close the battery compartment by sliding the cover or securing it with a latch. Ensure that it is fully closed to prevent the batteries from dislodging.
Step 9: Reattach the Smoke Detector
Carefully reattach the smoke detector to its mounting plate or base. Align the detector properly and twist it clockwise or use the provided tabs until it is securely in place.
Step 10: Test the Smoke Detector
Once the smoke detector is back in position, it’s important to test its functionality to ensure the batteries are working correctly. Look for a test button on the detector and press it for a few seconds. If the alarm sounds, your smoke detector is functioning properly.
Step 11: Regular Maintenance
Remember to schedule regular maintenance for your smoke detectors. Test them monthly by pressing the test button, and consider replacing the batteries at least once a year, or as recommended by the manufacturer. It’s also essential to clean the detectors periodically to remove dust or debris that could affect their performance.
By following these steps, you can confidently change the batteries in your smoke detector and ensure its continued effectiveness in detecting smoke and providing early warnings in case of a fire. Regular battery replacement and maintenance are crucial for the safety of you and your loved ones.
Trouble-Free Tips for a Seamless Smoke Detector Battery Swap
When it comes to changing smoke detector batteries, there are a few common and uncommon issues that people may encounter. Here are some of those issues along with solutions, tips, and advice to help you navigate through the process:
1. Common Issue: Difficulty in accessing the smoke detector.
Solution: Use a ladder or step stool to safely reach the detector. If it’s mounted on the ceiling, take extra caution while climbing and ensure proper balance.
2. Common Issue: Forgetting to turn off the power.
Solution: Before replacing the batteries, make sure to turn off the power to the smoke detector by either unplugging it or flipping the corresponding circuit breaker switch.
3. Common Issue: Using incorrect or incompatible batteries.
Solution: Always refer to the manufacturer’s instructions to determine the correct type of battery required for your smoke detector. Typically, 9-volt alkaline batteries are commonly used, but some models may have specific requirements. Avoid using rechargeable batteries as they may not provide a consistent power supply.
4. Common Issue: Batteries not lasting as long as expected.
Solution: If you find that your smoke detector batteries are draining quickly, consider the following tips:
– Use high-quality, fresh batteries from reputable brands.
– Avoid storing batteries in extreme temperatures.
– Clean the battery contacts in the detector to ensure proper connection.
– If the issue persists, it may be a sign of a malfunctioning detector, and it’s recommended to replace it.
5. Uncommon Issue: False alarms after battery replacement.
Solution: False alarms can occur due to various reasons such as dust accumulation, insects, or electrical interferences. To address this issue:
– Use a soft brush or vacuum cleaner attachment to gently clean the smoke detector vents regularly.
– Ensure that the detector is properly mounted and not loose.
– If false alarms persist, consult the manufacturer or consider replacing the detector.
6. Uncommon Issue: Smoke detector not functioning after battery replacement.
Solution: If the smoke detector does not function after replacing the batteries, try the following troubleshooting steps:
– Double-check the battery installation and ensure proper polarity.
– Clean the battery contacts and ensure a secure connection.
– Press the test button to verify if the alarm sounds. If not, consider replacing the detector.
Remember, smoke detectors are crucial for your safety, so it’s essential to regularly test them and replace batteries at least once a year or as recommended by the manufacturer. Additionally, consider installing interconnected smoke detectors for enhanced protection, as they can trigger all connected units when one detects smoke.
Power Up: A Foolproof Guide to Rejuvenating Smoke Detectors
For advanced users who are already experts in changing smoke detector batteries, there are several other home improvement projects that you can consider. Here are a few suggestions along with some advice on how to approach them:
1. Install a Smart Thermostat: Upgrade your home’s heating and cooling system by installing a smart thermostat. These devices offer advanced features like remote control, scheduling, and energy usage monitoring. Start by turning off the power, removing the old thermostat, and following the manufacturer’s instructions for installation. Make sure to connect the correct wires and test the system before completing the installation.
2. Upgrade Lighting to LED: Replace traditional incandescent or CFL bulbs with energy-efficient LED lights. LED bulbs last longer, consume less energy, and provide better lighting quality. While the process may vary depending on the type of fixtures you have, it generally involves removing the old bulb, inserting the LED bulb, and ensuring a secure connection. Be cautious of any electrical wiring and consult an electrician if needed.
3. Install a Home Security System: Enhance the safety of your home by installing a comprehensive home security system. This can include security cameras, motion sensors, door/window sensors, and a central control panel. Start by planning the system layout, identifying optimal locations for each component, and running any necessary wiring or setting up wireless connections. Follow the manufacturer’s instructions for installation and ensure proper testing and configuration.
4. Create a Smart Home Setup: Integrate various smart devices and appliances in your home for increased convenience and automation. This can involve setting up a smart hub or using voice assistants like Amazon Alexa or Google Assistant to control lights, thermostats, locks, and more. Each device may have specific installation instructions, so follow the manufacturer’s guidelines and ensure compatibility between different devices.
5. Renovate a Room: Take on a more extensive home improvement project, such as renovating a room. This could include painting, installing new flooring, upgrading fixtures, or even redesigning the layout. Plan the renovation carefully, ensuring you have the necessary tools and materials. Take safety precautions, such as wearing protective gear and following proper construction techniques. Seek professional assistance when needed, especially for complex tasks like electrical or plumbing work.
Remember, as an advanced user, it’s crucial to prioritize safety and follow proper guidelines, even if you’re already familiar with certain tasks. Additionally, always refer to the manufacturer’s instructions specific to the project you’re working on, as they may contain essential details and precautions.
Tweet