Fall with Style: DIY Parachute Tutorial
Sure, I would be happy to explain how to make a parachute! Here is a step-by-step guide:
1. Gather materials: To make a parachute, you will need a large piece of lightweight fabric, such as nylon or silk, string or cord, scissors, a ruler or measuring tape, and a sewing machine or needle and thread.
2. Cut the fabric: Depending on the size of your parachute, you will need to cut a square or circle from the fabric. You can use a ruler or measuring tape to ensure that the sides are all equal and the size is appropriate.
3. Hem the edges: To prevent the edges from fraying, you will need to hem them. You can use a sewing machine or needle and thread to sew a small hem around the edges of the fabric.
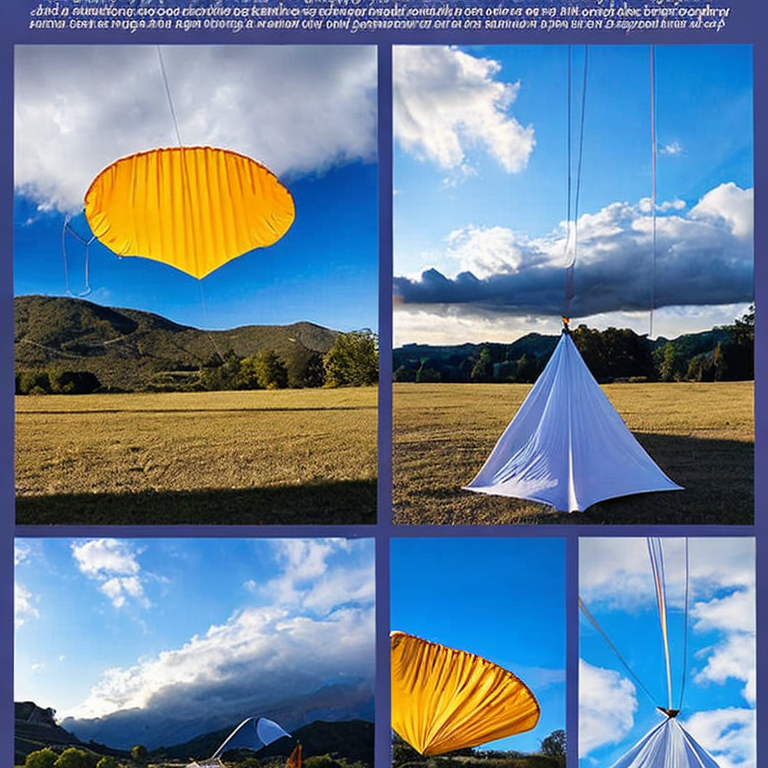
4. Attach the cords: Next, you will need to attach cords to the corners of the parachute. You can use strong string or cord for this. Tie one end of the cord to a corner of the parachute, and then tie the other end to a small ring or loop.
5. Attach the canopy lines: The canopy lines are the long cords that attach the parachute to the object it will be slowing down, such as a person or object. You will need to attach these lines to the small rings or loops on the cords you attached in step 4. Make sure the lines are all equal in length.
6. Test the parachute: Once you have attached the canopy lines, it’s time to test the parachute. Find a high place to drop the parachute from, such as a tall building or hill. Make sure there is no wind or other factors that could affect the test. Drop the parachute and observe how it falls. If it falls too quickly or unevenly, you may need to adjust the cords or fabric.
7. Make any necessary adjustments: If the parachute did not perform as expected during the test, you may need to make adjustments. You can adjust the canopy lines to change the amount of air resistance, or adjust the cords to change the shape of the parachute.
8. Use the parachute: Once you are satisfied with the performance of the parachute, you can use it for its intended purpose. Parachutes are commonly used in skydiving, as well as in science experiments and military operations.
And that’s it! With these steps, you should be able to make a functioning parachute. Just remember to test it thoroughly before using it in any situation where safety is a concern.
Surviving the Sky: Overcoming Parachute-Making Mishaps
When making a parachute, there are a number of issues that may arise. Some of the most common and uncommon issues, along with their solutions, tips and advice, are as follows:
1. Incorrect size of parachute: The size of the parachute should be in proportion to the weight of the object being dropped. A parachute that is too small may not provide enough drag to slow down the fall, while a parachute that is too large may cause the object to drift too far.
Solution: Measure the weight of the object and use a parachute size chart to determine the appropriate size of parachute.
2. Poorly designed parachute: A poorly designed parachute may not open properly or may not provide enough drag to slow down the fall.
Solution: Follow a reputable design pattern or tutorial, or consult an expert in parachute design.
3. Faulty materials: Faulty materials can cause the parachute to fail in mid-air.
Solution: Use high-quality materials that are specifically designed for parachute making.
4. Improper packing of the parachute: If the parachute is not packed properly, it may not open properly, leading to a dangerous situation.
Solution: Follow a proper packing technique and ensure that the parachute is packed tightly and securely.
5. Wind conditions: Wind conditions can affect the performance of the parachute.
Solution: Check the wind conditions before deploying the parachute, and adjust the size and shape of the parachute accordingly.
6. Uneven weight distribution: If the weight is not evenly distributed on the parachute, it may cause the parachute to spin or become unstable.
Solution: Ensure that the weight is evenly distributed on the parachute and test the parachute under controlled conditions before deploying it in a real-life situation.
7. Deployment issues: If the parachute does not deploy properly, it may not provide enough drag to slow down the fall.
Solution: Test the deployment mechanism thoroughly before using the parachute, and ensure that the parachute is properly attached to the object being dropped.
Overall, making a parachute requires careful consideration and attention to detail. By following proper techniques and using high-quality materials, you can create a safe and effective parachute that will perform as intended.
Fall in Style: Mastering the Art of Parachute Making
For advanced users who are already experts in making a parachute, there are several other interesting and challenging projects that they can undertake. Here are some ideas:
1. Kites: Making a kite can be a fun and challenging project for advanced users. Kites come in many different shapes and sizes, and can be made from a variety of materials. For example, you can make a traditional diamond-shaped kite using bamboo sticks and paper, or a more complex box kite using lightweight fabric and carbon fiber rods.
2. Gliders: Building a glider can be a rewarding project for advanced users who want to explore the principles of aerodynamics. Gliders come in many different designs, from simple paper airplanes to more complex models made from balsa wood and other lightweight materials.
3. Rockets: Building a rocket can be a thrilling and challenging project for advanced users. Rockets can be powered by solid or liquid fuel, and can be designed to reach different altitudes and speeds. There are many different rocket kits available, or advanced users can design and build their own from scratch.
4. Drones: Building a drone can be a complex and rewarding project for advanced users who want to explore the world of unmanned aerial vehicles. Drones can be built from kits or from scratch using components such as motors, ESCs, and flight controllers.
5. RC Planes: Building an RC plane can be a challenging and rewarding project for advanced users who want to fly their own remote-controlled aircraft. RC planes can be designed and built from scratch using balsa wood, foam, and other materials, or advanced users can purchase kits or ready-to-fly models.
When undertaking any of these projects, it’s important for advanced users to have a solid understanding of the principles of aerodynamics, as well as the ability to work with a variety of materials and tools. They should also be familiar with safety precautions and regulations related to the project they are undertaking.
Tags: airborne, canopy, construction, cords, deployment, design, DIY, equipment, freefall, homemade, howto, landing, materials, nylon, packing, parachute, rigging, safety, skydiving, tutorial
Tweet