Take to the Skies: DIY Kite-Making Tutorial
Sure, I’d be happy to walk you through the process of making a kite!
Kites have been around for thousands of years and are enjoyed by people of all ages. They are a fun and inexpensive way to enjoy the outdoors, and making your own kite can be a rewarding and enjoyable experience.
Before we get started, there are a few things you’ll need:
– A lightweight, sturdy material for the kite frame (such as bamboo or dowels)
– A light but strong material for the kite sail (such as ripstop nylon or polyester)
– Kite string or line
– Scissors
– Glue
– Tape
– A ruler or measuring tape
Step 1: Choose your kite design
There are many different kite designs, but the simplest and most traditional is the diamond kite. This is the design we’ll be using for this tutorial.
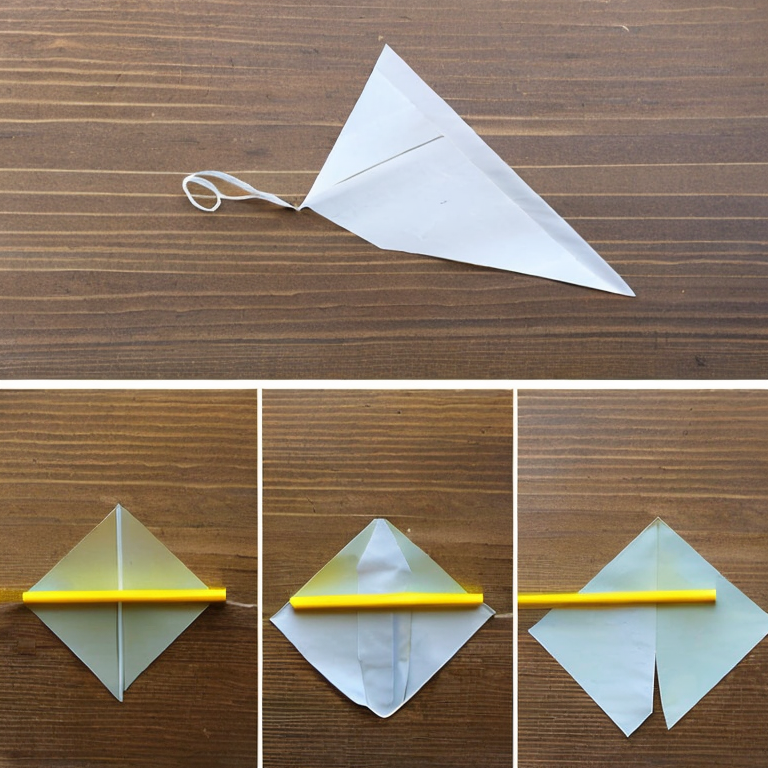
Step 2: Cut the kite frame
The diamond kite frame consists of two crossed sticks, or spars, that form a diagonal “X” shape. Cut two sticks to the desired length (for example, 24 inches) and lay them on top of each other in a cross shape. Use glue or tape to hold them together at the center point where they cross. Then, measure and cut two more sticks to lay diagonally across the first two sticks, creating the diamond shape. Glue or tape these sticks in place as well.
Step 3: Attach the kite sail
Cut your kite sail material to the desired size, making sure it is larger than the kite frame. Lay the kite sail over the kite frame so that the edges of the sail extend beyond the edges of the frame. Fold the edges of the sail over the frame and secure them with glue or tape. Make sure the sail is taut but not too tight, as this can cause the kite to fly poorly.
Step 4: Add the tail
Kites need tails to help stabilize them in the air. Cut a long strip of lightweight material (such as crepe paper or ribbon) and attach it to the bottom of the kite sail with glue or tape. The length of the tail should be about 3-5 times the length of the kite itself.
Step 5: Add the bridle
The bridle is the string or line that connects the kite to the flying line. Cut a length of string or line that is about 1.5 times the length of the kite. Tie one end of the bridle to the top of the kite frame, in the center where the sticks cross. Tie the other end of the bridle to the flying line, about 2/3 of the way up from the bottom of the kite.
Step 6: Test fly your kite
Now that your kite is complete, it’s time to test fly it! Choose an open area with plenty of space and no overhead wires or obstacles. Hold the kite by the bridle and let out some line. Run into the wind until the kite catches the breeze and begins to lift off the ground. Adjust the bridle as needed to keep the kite flying straight and steady.
Congratulations, you’ve made your own kite! With a little practice and experimentation, you can modify this design to create all sorts of different kites, from box kites to delta kites to stunt kites. Enjoy the outdoors and happy flying!
Kite Making Woes: Avoiding the Common Blunders
Making a kite can be a fun and rewarding activity, but there are a few common and uncommon issues that you may encounter along the way. Here are some tips and advice to help you troubleshoot these issues and enjoy a successful kite-making experience:
1. Common issue: The kite refuses to fly or flies poorly.
Solution: Make sure that the kite is properly balanced with the bridle lines and that the tail is long enough to stabilize the kite. Also, check the wind conditions – if there is not enough wind, the kite may not fly well.
2. Common issue: The kite falls apart or tears during flight.
Solution: Use strong and durable materials such as ripstop nylon or polyester for the kite body and tail. Make sure to reinforce the stress points with extra tape or stitching. Also, avoid flying the kite in strong winds or during storms.
3. Common issue: The kite spins or loops uncontrollably.
Solution: This may be due to an imbalance in the bridle lines or the weight distribution of the kite. Adjust the bridle lines and add weight to the tail as needed to achieve stability.
4. Uncommon issue: The kite attracts birds or other wildlife.
Solution: If you are flying the kite in an area where there are birds or other wildlife, consider using a bird scare tape or other deterrent to keep them away from the kite.
5. Uncommon issue: The kite gets stuck in a tree or other obstacle.
Solution: Try to avoid flying the kite near trees or other obstacles. If the kite does get stuck, gently tug on the line to see if you can dislodge it. If that doesn’t work, try using a long stick or pole to gently nudge the kite free.
Remember to always follow safety guidelines when flying kites, such as avoiding flying near power lines or in crowded areas. With a little patience and practice, you can enjoy the thrill of watching your homemade kite soar through the sky.
Take to the Skies: A Pro’s Guide to Crafting Kites
For advanced users who are already experts in making kites, there are several other kite-related projects that they can explore. Here are a few ideas:
1. Kite Aerial photography (KAP): KAP is the art of taking aerial photographs using a kite as the camera platform. Advanced kite makers can create specialized kites for KAP, such as delta kites with a camera rig attached. They can also experiment with different cameras and lenses to get the perfect shot. To get started with KAP, experts can look for KAP forums online or join a local KAP group.
2. Kiteboarding: Kiteboarding, also known as kitesurfing, is a water sport that involves riding on a board while being pulled by a kite. Advanced kite makers can create specialized kites for kiteboarding, such as inflatable kites that can be easily launched and landed from the water. They can also experiment with different board designs to find the perfect combination of speed and maneuverability.
3. Kite Fighting: Kite fighting is a popular sport in many parts of the world, especially in Asia. Advanced kite makers can create specialized kites for kite fighting, such as diamond kites with sharp edges or flexible bamboo frames. They can also experiment with different string materials and tensions to make their kites more agile in the air.
4. Power Kiting: Power kiting involves using large, powerful kites to generate lift and pull the user across the ground or water. Advanced kite makers can create specialized power kites, such as parafoil kites with multiple cells and a high aspect ratio. They can also experiment with different line lengths and strengths to find the perfect balance between power and control.
When exploring these advanced kite-related projects, it is important for experts to always prioritize safety. They should also continue to learn and experiment with new techniques and materials to push the boundaries of what is possible with kite making.
Tags: children'sactivity, Creativity, DIYkite, familybonding, flyingkite, handcraftedkite, homemadekite, kitebuilding, kiteconstruction, kitecrafts, kitedesign, kiteflyingtips, kitemaking, kitematerials, kitepatterns, kitesafety, kitestring, kitetail, outdooractivity, summerfun
Tweet