Spin Your Way to Nutrient-Rich Soil: DIY Compost Tumbler
Composting is a great way to recycle organic waste and create nutrient-rich soil for gardening. One popular method of composting is using a compost tumbler. A compost tumbler is a container that can be rotated to mix and aerate the compost, making the process faster and more efficient than traditional composting methods.
To make a compost tumbler, you will need a few materials and tools:
Materials:
– A 55-gallon drum with a removable lid
– A sturdy metal frame or stand
– A piece of PVC pipe (3-4 inches in diameter and 2-3 feet long)
– Screws and bolts
– Wire mesh or hardware cloth
– A drill with a large bit and a small bit
– A jigsaw or sawzall
Tools:
– A measuring tape
– A marker or pen
– Safety glasses
– Work gloves
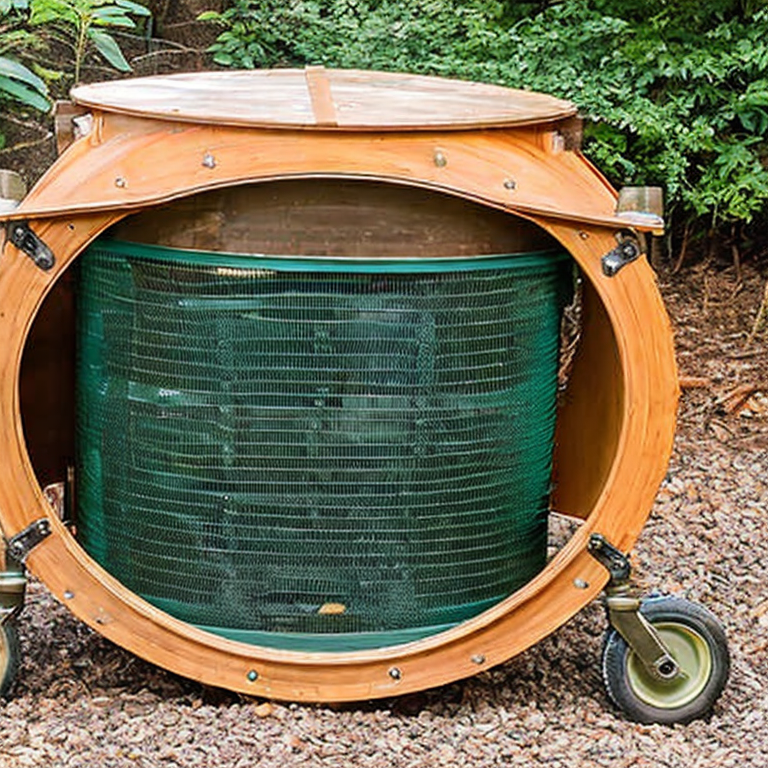
Step 1: Prepare the Drum
First, you will need to prepare the drum. Make sure it is clean and free of any chemicals or residues. Remove the lid and drill several large holes (about 2-3 inches in diameter) around the sides of the drum. These holes will allow air to circulate through the compost.
Step 2: Make the Frame
Next, you will need to make a sturdy frame or stand to hold the drum. This can be made from metal pipes or lumber. The stand should be at a comfortable height for you to rotate the drum.
Step 3: Add the PVC Pipe
Drill a small hole in the center of the bottom of the drum. Insert the PVC pipe into the hole and secure it with screws or bolts. This pipe will act as an axle for the drum to rotate on.
Step 4: Add Wire Mesh
Cut a piece of wire mesh or hardware cloth to fit over the holes in the drum. Use the small drill bit to make holes around the edges of the mesh. Attach the mesh to the drum using screws or bolts.
Step 5: Cut the Door
Use a jigsaw or sawzall to cut a door in the side of the drum. The door should be large enough to easily add and remove compost materials.
Step 6: Mount the Drum
Place the drum on the stand and secure it in place using bolts or straps. Make sure the drum is level and can rotate freely on the PVC pipe.
Step 7: Add Compost Materials
Start adding compost materials to the drum. This can include vegetable and fruit scraps, leaves, grass clippings, and other organic matter. Make sure to add a variety of materials to create a balanced compost.
Step 8: Rotate the Drum
Use the handle on the drum to rotate it every few days. This will mix and aerate the compost, helping it to break down faster. You can also add water to the compost if it seems dry.
Step 9: Harvest the Compost
After a few weeks or months, the compost should be ready to use. Open the door on the side of the drum and remove the compost. Use it in your garden or save it for later use.
Congratulations, you now know how to make a compost tumbler! With a little effort and patience, you can turn your organic waste into nutrient-rich soil for your plants.
Composting Woes? Tumble Your Troubles Away!
When making a compost tumbler, there are several common and uncommon issues that may arise. Here are some of them and their solutions:
1. Poor aeration: If the compost tumbler is not aerated properly, it may become too wet and smelly. To solve this problem, make sure that the compost tumbler has enough ventilation holes and that you turn it regularly to mix the contents.
2. Too dry or too wet: If the compost tumbler is either too dry or too wet, it may not break down the organic matter effectively. To solve this problem, add more water if it is too dry or add more dry materials such as leaves or shredded paper if it is too wet.
3. Pests: Pests such as rodents and flies may be attracted to the compost tumbler. To prevent this, make sure that the compost tumbler is sealed properly and that you don’t add any meat or dairy products.
4. Unpleasant odor: If the compost tumbler smells bad, it may be due to too much nitrogen-rich materials such as food scraps. To solve this problem, add more carbon-rich materials such as dried leaves or straw.
5. Uneven decomposition: If the compost tumbler is not properly mixed, some parts may decompose faster than others. To prevent this, make sure that you turn the compost tumbler regularly and mix the contents well.
6. Leaks: If the compost tumbler leaks, it may be due to a crack or hole in the container. To solve this problem, check the container for any damage and repair it if necessary.
Tips and advice:
– Use a balance of carbon-rich and nitrogen-rich materials to ensure that the compost tumbler breaks down the organic matter effectively.
– Keep the compost tumbler in a sunny area to speed up the decomposition process.
– Use a compost thermometer to monitor the temperature of the compost.
– Avoid adding any weed seeds or diseased plants to the compost tumbler.
– Don’t add any animal products to the compost tumbler as they may attract pests and cause unpleasant odors.
Spin your way to nutrient-rich soil with a DIY tumbler
For advanced users who have already mastered the art of making a compost tumbler, there are a few other projects that can take their composting game to the next level. Here are some suggestions:
1. Worm composting: Vermicomposting is a great way to turn food scraps and other organic material into nutrient-rich compost quickly. You can build a worm bin using a plastic container or purchase one online. You’ll need to add bedding and red wigglers, feed them regularly, and harvest the compost as it’s ready.
2. Bokashi composting: Bokashi composting is a Japanese method that uses a special mix of microorganisms to break down food scraps quickly. You can purchase a bokashi kit online or make your own mix using bran, molasses, and EM (effective microorganisms). Simply add the food scraps to the bokashi bucket, sprinkle the mix on top, and wait for it to ferment. Once the bucket is full, bury the contents in your garden or add it to a traditional compost pile.
3. Hot composting: Hot composting is a faster method of composting that requires a bit more effort. You’ll need to create a pile that’s at least 3 feet high and 3 feet wide, layering green and brown materials and turning it regularly to maintain a high temperature. Hot composting can produce finished compost in as little as a month.
4. Compost tea: Compost tea is a liquid fertilizer made by steeping compost in water. It’s a great way to give your plants a boost of nutrients and can be applied directly to the soil or sprayed on the leaves. You can make compost tea using a simple bucket or purchase a compost tea brewer online.
As an expert in making a compost tumbler, my advice would be to start small and experiment with different methods to find what works best for you. Keep in mind that composting is a natural process, and it’s okay to make mistakes along the way. Be patient, stay curious, and enjoy the process of turning your food scraps into nutrient-rich soil for your garden.
Tags: aerobic, backyard, composttumbler, composting, decomposition, DIY, eco-friendly, environment, Fertilizer, gardening, greenliving, homemade, microorganisms., nutrients, organicgardening, recycling, soilhealth, sustainability, upcycling, wastereduction
Tweet