Grow Up: DIY Trellis Tips
A trellis is a structure used to support climbing plants, such as vines, flowers, and vegetables. It is a great addition to any garden or outdoor space, as it not only provides support for plants but also adds aesthetic appeal to the area. In this guide, we will go through the steps involved in creating a trellis.
Materials needed:
– Wooden stakes (2-3 feet in length)
– Wooden boards (1×2 or 2×2 inches)
– Nails or screws
– Twine or wire
– Pliers or wire cutters
– Hammer or drill
Step 1: Determine the Location and Size of the Trellis
Before you start building your trellis, you need to determine the location where you want to place it. Consider the type of plants you want to grow and choose a spot that gets enough sunlight and has enough space for the plants to climb. Once you have identified the location, measure the area to determine the size of the trellis you need.
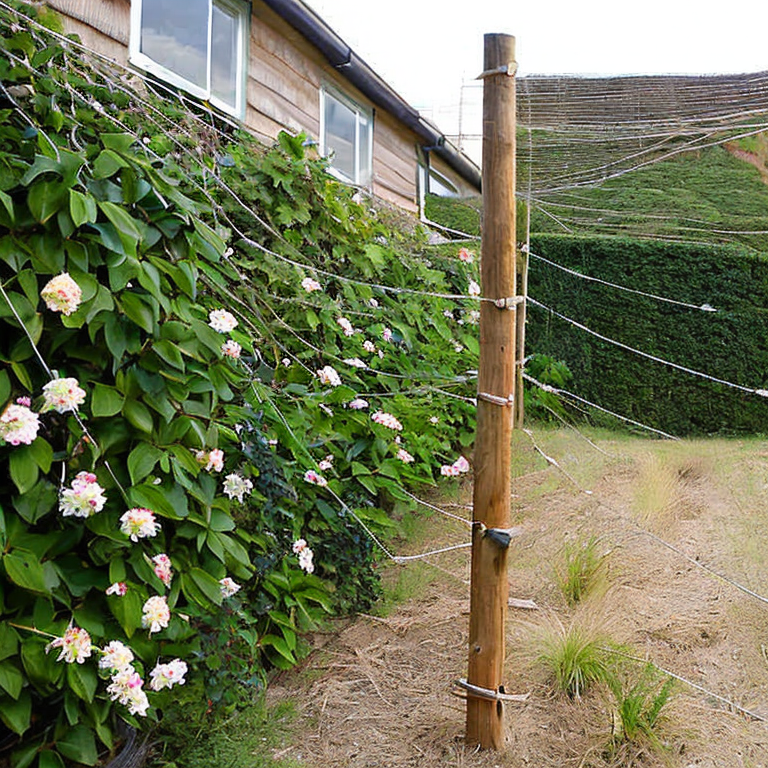
Step 2: Install the Wooden Stakes
Once you have determined the location and size of the trellis, it’s time to install the wooden stakes. These stakes will serve as the support structure for the trellis. Hammer the stakes into the ground at a distance equal to the width of the trellis. Make sure they are firmly in place and are level with each other.
Step 3: Attach the Wooden Boards
Next, attach the wooden boards horizontally to the stakes. Use nails or screws to secure the boards to the stakes, making sure they are level and parallel to each other. Depending on the size of your trellis, you may need to attach additional boards to provide more support.
Step 4: Add the Twine or Wire
Now that the wooden structure is in place, it’s time to add the twine or wire. This will provide the necessary support for the climbing plants. Attach one end of the twine or wire to the top of one stake using pliers or wire cutters. Stretch the twine or wire to the top of the other stake and attach it in the same way. Make sure the twine or wire is taut and parallel to the wooden boards.
Step 5: Repeat the Process
Repeat the process of attaching twine or wire to the wooden boards at intervals of 6-8 inches. This will provide ample support for the plants as they grow and climb.
Step 6: Train the Plants
As your plants grow, use garden twine or plant ties to train them to climb up the trellis. Gently tie the stems of the plants to the twine or wire, making sure not to damage the plant. Continue to train the plants as they grow, tying them to the trellis at regular intervals.
That’s it! With these simple steps, you can create a trellis that will provide support and aesthetic appeal to your garden. Remember to choose the right location, ensure the stakes are firmly in place, and train your plants to climb the trellis. With a little care and attention, you’ll have a beautiful garden in no time!
Trellis Troubles? Here’s What You’re Doing Wrong
When making a trellis, there are several common and uncommon issues that one may encounter. Here are some of them, along with possible solutions, tips, and advice:
1. Choosing the wrong materials: Using the wrong materials can result in a weak or unstable trellis. It’s important to choose materials that are strong, durable, and appropriate for the type of plants you’ll be growing.
Solution: Choose materials such as pressure-treated wood, cedar, or metal that are designed to withstand outdoor conditions. Consider the weight of your plants and choose materials that can support the weight.
2. Incorrect spacing: If the trellis is too narrow or too wide, the plants may not have enough room to grow or may be overcrowded.
Solution: Measure the area where you’ll be placing the trellis and choose the appropriate size. Consider the growth rate of your plants and space the trellis accordingly.
3. Insufficient anchoring: If the trellis is not anchored properly, it may sway or fall over in strong winds.
Solution: Use sturdy anchors such as metal stakes, concrete blocks, or heavy rocks to secure the trellis. Make sure the anchors are buried deep enough and firmly in the ground.
4. Inadequate support: If the trellis doesn’t provide enough support, the plants may not climb properly or may break under their own weight.
Solution: Use strong wire, twine, or netting to support the plants. Make sure the support system is securely attached to the trellis and can withstand the weight of the plants.
5. Lack of maintenance: Over time, the trellis may become damaged, weakened, or overgrown with vines.
Solution: Regularly inspect the trellis for damage or signs of wear and tear. Clean off any debris or vines that may be weighing it down. Make repairs as needed to ensure the trellis remains strong and stable.
By following these tips and solutions, you can create a sturdy and reliable trellis that will support your plants throughout their growth cycle.
Level up your gardening game: Master trellis making
For advanced users who are already experts in making a trellis, there are several other projects that you can take on to enhance your garden or outdoor space. Here are some ideas:
1. Pergola: A pergola is a larger structure than a trellis and can offer more shade and privacy. It is a great addition to any outdoor space and can be used to create an outdoor seating area or dining space. To build a pergola, you will need to use larger beams and posts than a trellis and may require more advanced carpentry skills.
2. Arbor: An arbor is a smaller version of a pergola and is often used as an entryway to a garden or as a focal point in a flower bed. It can be built using similar techniques as a trellis, but will require more structural support to withstand the weight of climbing plants.
3. Garden Fence: A garden fence can be a beautiful and functional addition to any garden. It can be built using a variety of materials such as wood, metal, or vinyl and can be designed to match the style of your home and garden. Fencing requires more advanced carpentry skills and may require digging post holes and pouring concrete footings.
4. Garden Gate: Adding a garden gate to your fence or arbor can add charm and character to your outdoor space. Gates can be built using a variety of materials and styles, and can be designed to match the style of your home and garden.
As an expert in making a trellis, my advice is to always take the time to plan your project carefully before starting. Make sure you have all the necessary tools and materials, and measure everything twice to avoid mistakes. It’s also important to consider the weight of the climbing plants you plan to use and make sure your structure can support them. And finally, don’t be afraid to challenge yourself and try new projects – that’s how you continue to grow and improve your skills.
Tags: backyard, build, climbing, design, DIY, easy, garden, gardening, homemade, inexpensive, lattice, outdoor, plants, structure, support, trellis, tutorial, vertical, vines, wooden
Tweet